How do I commit my working [transform SQL] query to DAP⇨flow's [dap-airflow] repository?

1. Access Amazon Athena with your [service workgroup]
🖱 In your web browser, log in to your AWS account, navigate to the AWS Management Console, and open Amazon Athena.
🖱 Ensure you have selected your [service workgroup] from the list box next to “Workgroup”.
2. Prepare and make ready your [transform SQL] query
🖱 Ensure you have already created, tested and saved your [transform SQL] as a working, fully functional Athena SQL query.
👉 If you want reminding of how to do any of that, see here or here ►
🖱 Open your [transform SQL] in the Amazon Athena query editor and keep it open in a web browser tab.
3. Access the dap-airflow repository in GitHub
🖱 Use another tab in your web browser to log into your GitHub account using your Hackney email address with two-factor authentication.
👉 Users without a GitHub account or existing GitHub users without membership of the London Borough of Hackney organization, should check back at the start ► DAP⇨flow📚GitHub access
🖱 Open the dap-airflow repository in your web browser.
4. Open your [service dags]/transformations subfolder on a your [transform branch]
🖱 Ensure you have created your 
[transform branch] and have it selected.
Fig. 4a 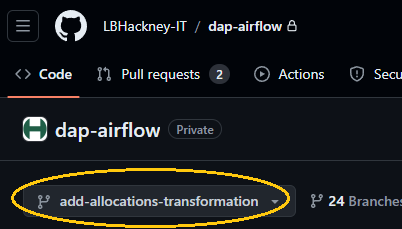
👉 For how to create your [transform branch], see here ► DAP⇨flow📚GitHub branching
🖱 In the [dap-airflow] repository, navigate to your dap-airflow/airflow/dags/ [service dags]/transformations service sub-folder. You can use GitHub’s left-hand navigation pane as follows:
- Click on the
airflowfolder - Inside the
airflowfolder, click on thedagsfolder - Inside the
dagsfolder, click on your[service dags]folder - Inside the
[service dags]folder, click on thetransformationssubfolder
Fig. 4b & 5a 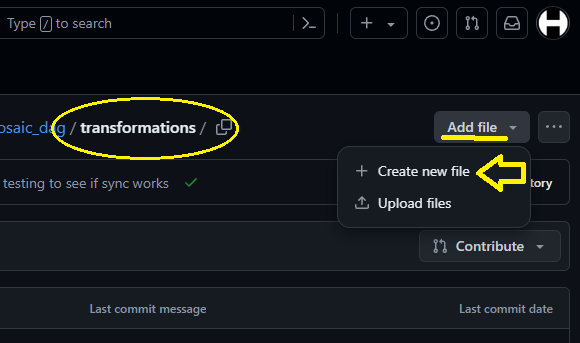
5. Create your new [transform].sql file in GitHub
🖱 At the top right region of the page, click the "Add file" button and select "Create new file"
🖮 In the box following the transformations/ subfolder, enter your [transform].sql.
Fig. 5b 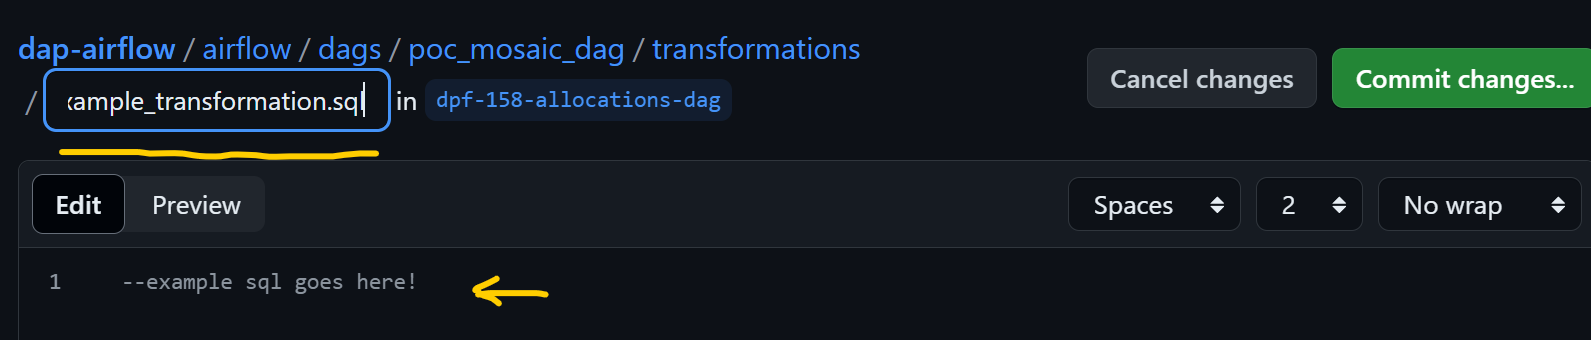
🖱 Keep this Github code editor and it's web browser tab open for later on.
6. Copy your [transform SQL] code from Amazon Athena
🖱 Switch back to the Amazon Athena tab in your web browser, with your [transform SQL] still in the query editor.
🖱 Select your entire [transform SQL] code in the Athena query editor.
Fig. 6 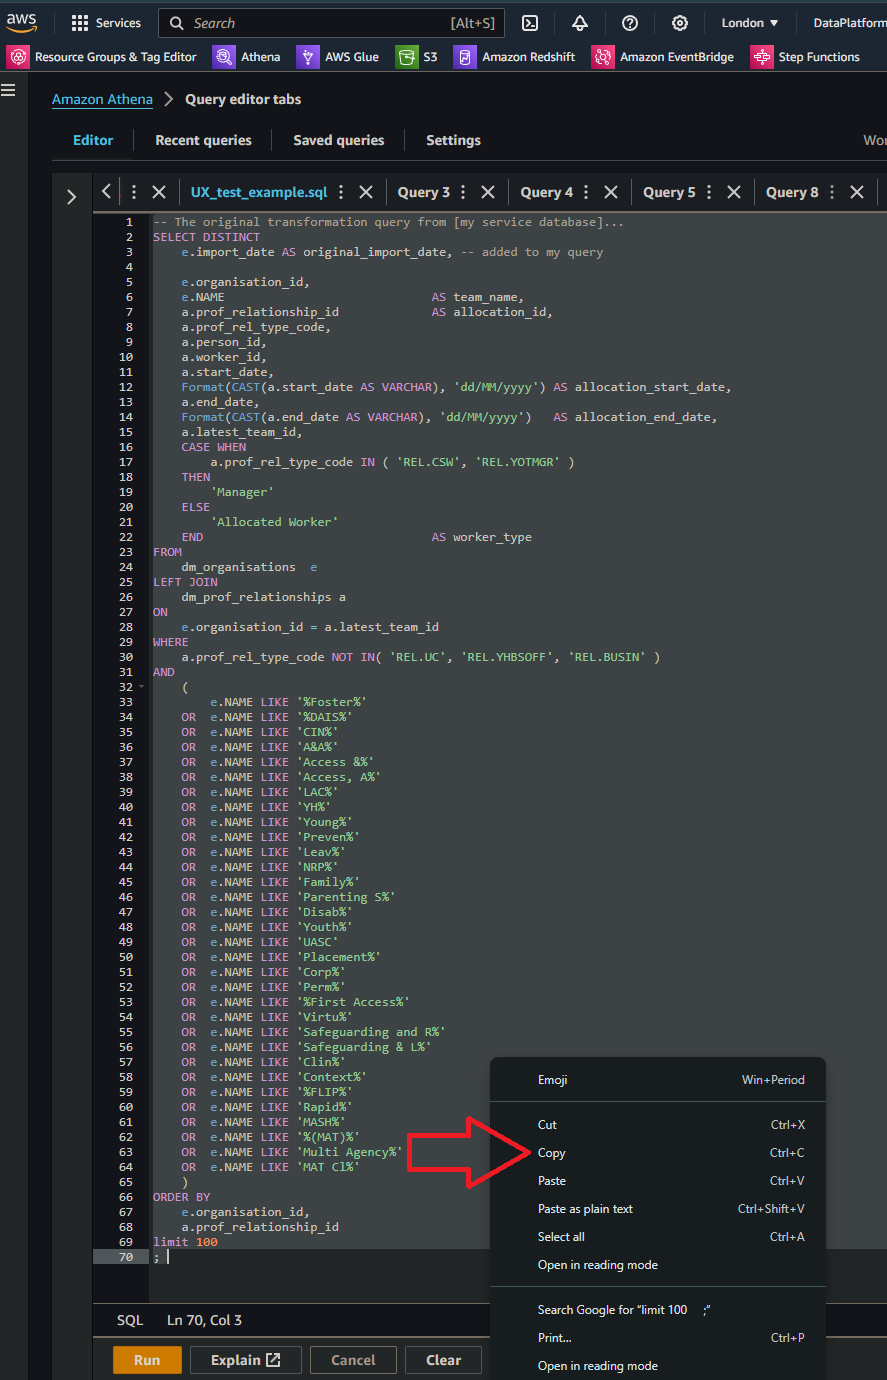
🖱 Use the right-click menu to "Copy" the selected code to your computer’s clipboard.
7. Paste your [transform SQL] code into GitHub
🖱 Switch back to the GitHub tab in your web browser, with [transform].sql currently empty in the code editor.
🖱 In the GitHub editor window beneath where it says “Edit”, use the right-click menu to "Paste" your entire [transform SQL] code, from the computer’s clipboard, into your [transform].sql file.
Fig. 7 & 8 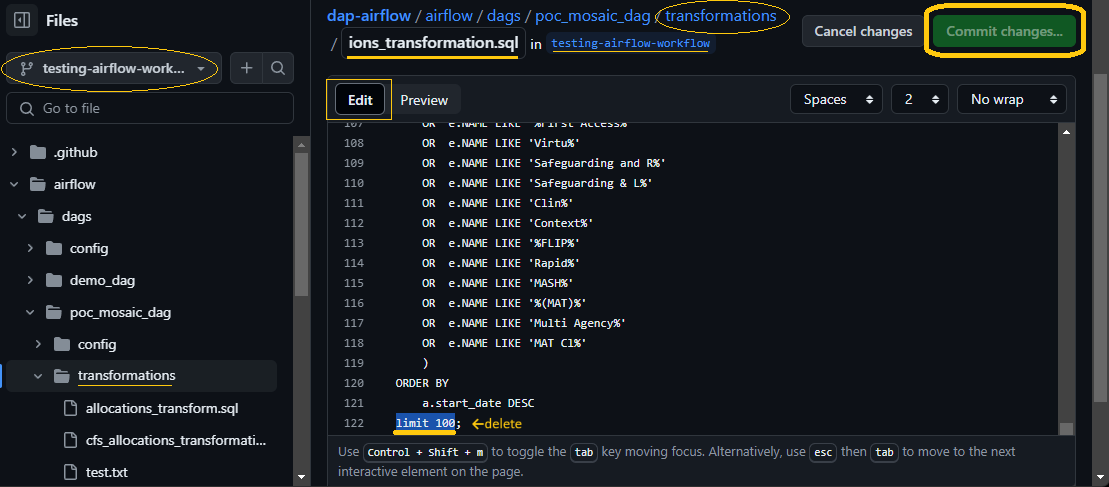
8. Review and adjust your [transform SQL] code
🖱 Scroll to the bottom of the GitHub editor window to remove any limit clause (e.g., limit 100), leaving just the final ; semi-colon at the very end.
👁 If you spot problems in your code you have an opportunity to fix them now, or fix them later.
9. Commit your [transform].sql file
🖱 Click the "Commit changes" button to open a dialogue box.
Fig. 9 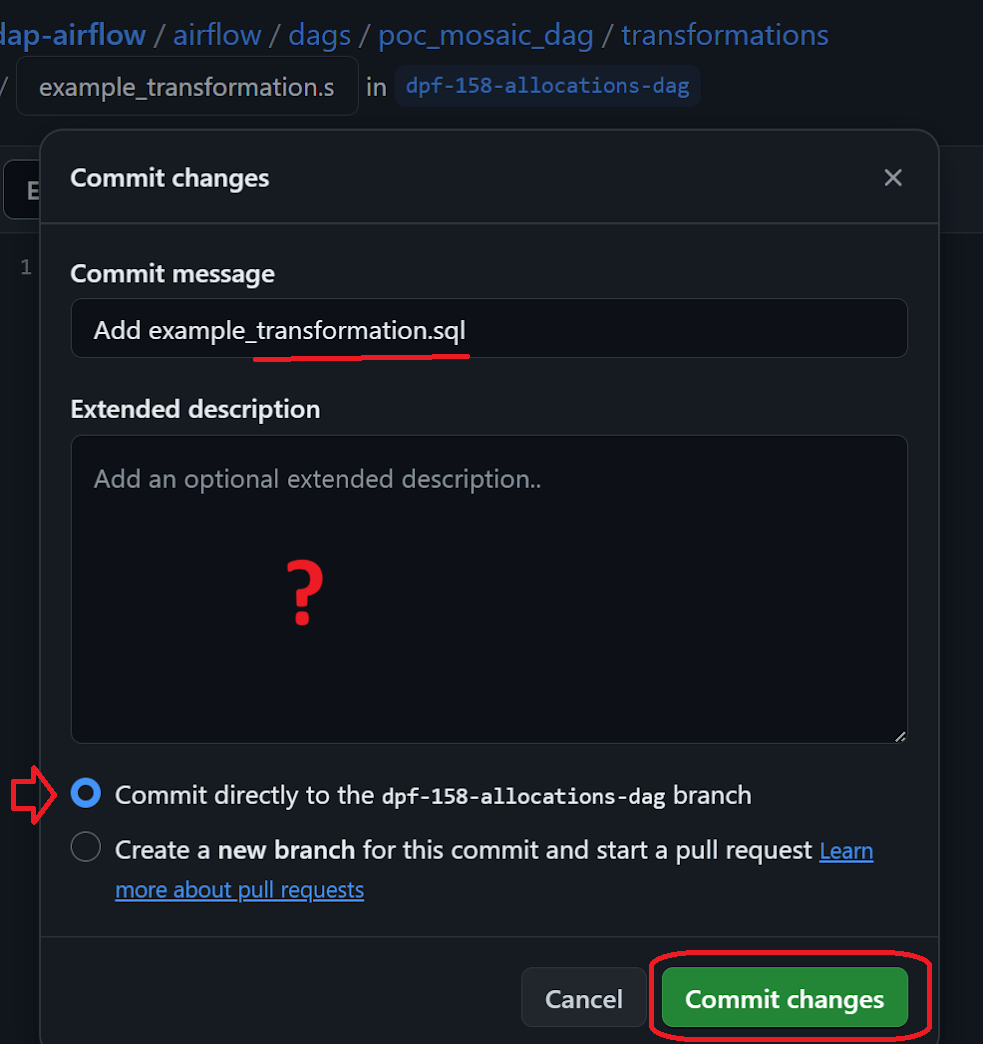
🖮 Enter a short commit message, Eg. Add ... [transform].sql.
🖮 Enter a longer description if wanted.
🖱 Select the option “Commit directly to the [transform branch]”.
🖱 Click the "Commit changes" button.
👁 You should see a message confirming your [transform].sql was successfully committed directly to your [transform branch].
10. Making subsequent changes to [transform].sql
Whether you are just fault-fixing or you want to add new SQL code features to your [transform SQL]:
🖱 In the GitHub editor window beneath where it says “Edit”, you can edit your [transform].sql file directly.
🖱 Alternatively, you can use the right-click menu to "Paste" a new version of your [transform SQL] code, from the computer’s clipboard, into your [transform].sql file.
💡 But unlike regular code editors, GitHub will not allow you to simply "Save" consecutive changes to your code then come back later to finally commit your [transform].sql with the rest of your [transform branch]. Using GitHub's web console in this way absolutely requires you to re-commit your [transform branch] each and every time you edit or change your files. If you closed your web browser before committing, you would lose the edits you did using GitHub's editor since the previous commit.
👉 After editing [transform].sql each time, simply repeat from ► step 9.
👉 You may commit as often as you need to, until finally, you raise a pull request, here ► DAP⇨flow📚GitHub pull request
"We ♡ your feedback!"
👉 Please use this link ► DAP⇨flow UX Feedback / github-commit-transform
Your feedback enables us to improve DAP⇨flow and our Data Analytics Platform service.
We encourage all our users to be generous with their time, in giving us their recollections and honest opinions about our service.
We especially encourage our new users to give feedback at the end of every 📚Onboarding task because the quality of the onboarding experience really matters.
☝ Please use this link to help us understand your user experience!
📚UX Criteria
- Hackney Google Workspace user
- Hackney
[service]Data Analyst - Amazon Athena user
- GitHub user
How do I commit my working [transform SQL] query to DAP⇨flow's [dap-airflow] repository?
Measures the behavior of GitHub and Amazon Athena.
Given in my web browser, I have logged into my AWS account
~and I accessed Amazon Athena
~and I have selected my [service workgroup]
~and I have created and saved my [transform SQL] as a working fully functional Athena SQL query
~and I have my [transform SQL] kept open in the Athena query editor in a web browser tab
~and in another tab in my web browser, I am logged on to my GitHub account using my Hackney email address with two-factor authentication
~and I am granted membership of the London Borough of Hackney organization on GitHub incorporating the dap-airflow private repository
~and I have accessed the dap-airflow repository
~and I previously created my [transform branch]
When I select my [transform branch] as my working branch
~and I navigate to my dap-airflow/airflow/dags/ [service dags]/transformations service subfolder
~and at the top right region of the page, click the "Add file" button and select "Create new file"
~and in the box following the transformations/ subfolder, I enter my [transform].sql
~and back in the Amazon Athena web browser tab, I select my entire [transform SQL] code in the Athena query editor before copying it into the computer’s clipboard
~and back in the GitHub web browser tab, in the editor window, beneath where it says “Edit”, I paste my [transform SQL] code, from the computer’s clipboard, into my [transform].sql file
~and I scroll to the bottom of the editor window to check and remove any limit clause (eg. limit 100), leaving just the ; semi-colon at the very end
~and I click the "Commit changes" button to open up a dialogue box
~and I enter a short commit message, Eg. Add ... [transform].sql
~and I enter a longer description if I want to
~and I select the option “Commit directly to my [transform branch]
~and I click the "Commit changes" button
Then I should see a message telling me, my [transform].sql was successfully committed directly to my [transform branch]
~and I will be permitted to make further edits to my [transform].sql followed by commits to my to my [transform branch], as often as I need to, until I raise a pull request for my [transform branch].
Scale of 12 to 20 ~and flow features.